Comet „Neowise“

Lately there was a comet…

As I am quite interested in space, I decided to take some pictures of it. Today it is cloudy, so I cant take more pictures. So here is what I learned so far.

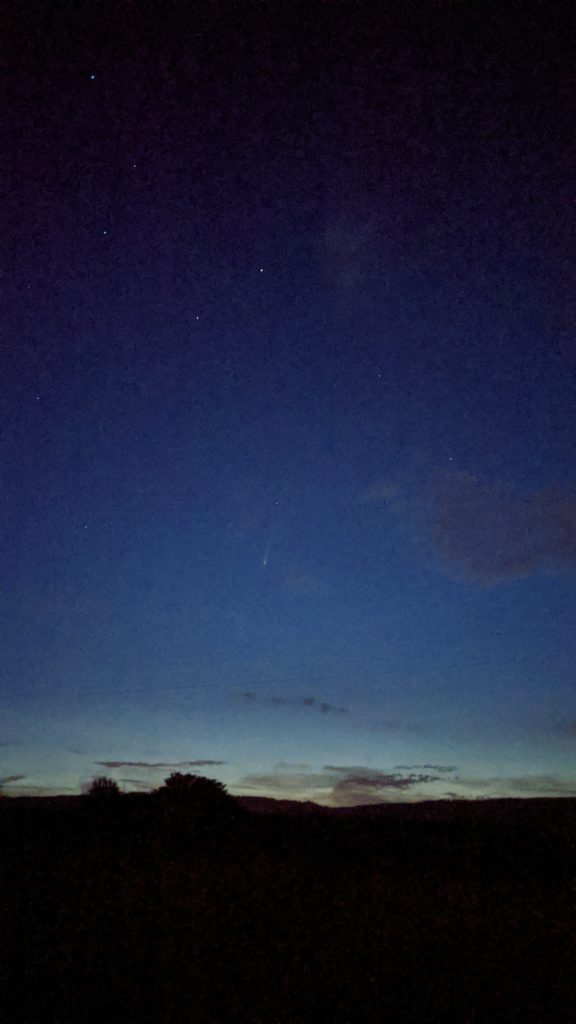
First day, I just tried to find it and took a picture with Google-Camera night vision. It is quite easy to spot, just below the Big Dipper (Großer Wagen). For my surprise, this went fairly well for such a small camera. But I guess the night vision mode does some photo stacking.

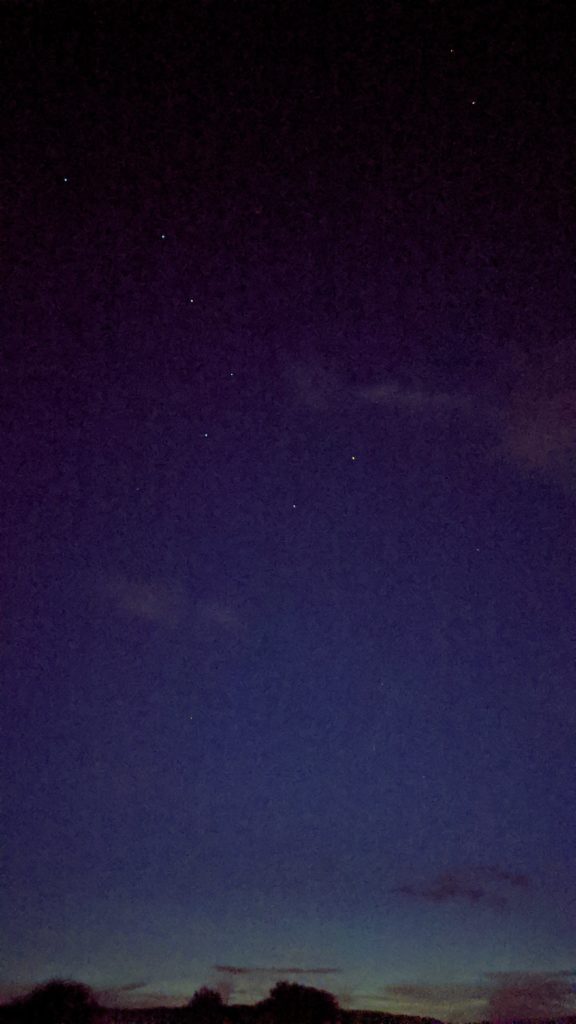
Stacking the pictures myself didn’t went well. On the third night I experimented around and did some long exposure Photo after I encountered some wild boar with his young. They can be fairly dangerous especially with young. But the fleet when I pointed my Flashlight on them.

Nevertheless I am quite proud of this first shot. I will try to do some picture stacking on my next attempt. I think i need to get the camera settings right.
I will try the settings from this site next time. http://xjubier.free.fr/en/site_pages/astronomy/MilkyWayExposureCalculator.html

A closer look …

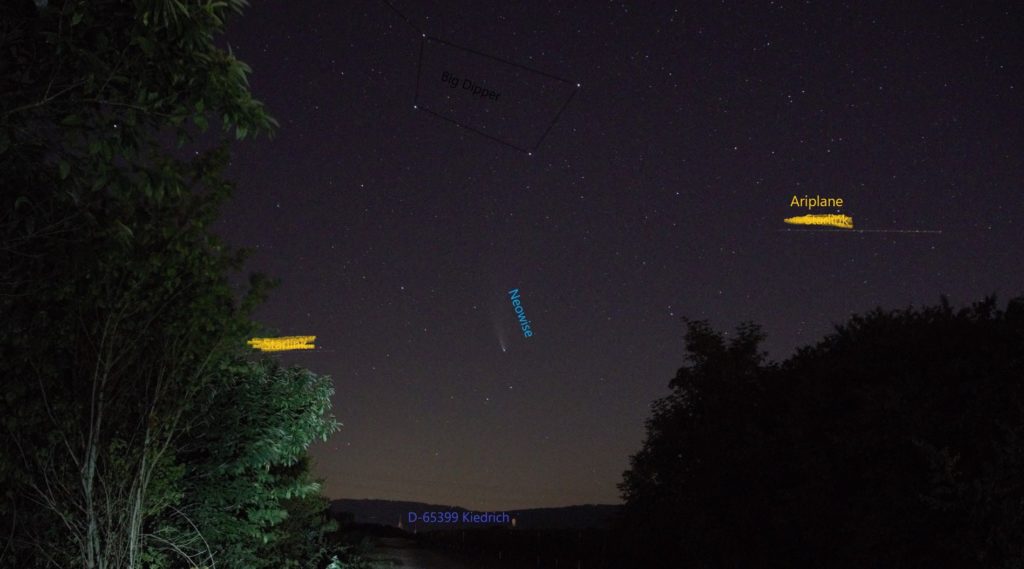
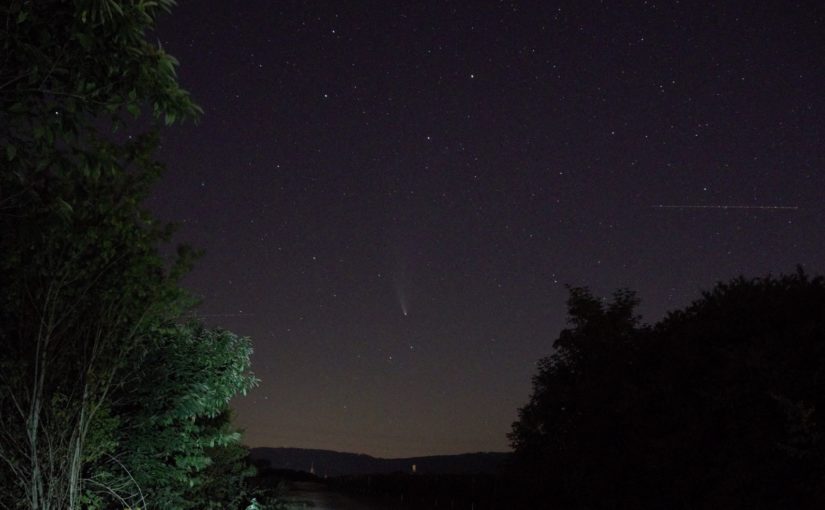
On the picture you can see comet „Neowise“ right in the center, straight below the Big Dipper. In the far back you can see some tall buildings from Kiedrich Village. On the right and left I hit some Starlink satellite trains. I never saw them before, but I can understand now why astronomers are so worried about Starlink. You can see the bushes in the foreground on the left. I think they are only visible, because I messed around with my flashlight. But it gives the picture a nice accent.
Update: No! Thats not Starlink these are just plain old planes.

The Picture is completely unmodified. No Photoshop, nothing.

Camera ModelILCE-6000
F-Number / BlendeF/5.6
ISO-Value2500
Focal length / Brennweite16 mm
Exposure time / Belichtungszeit25 s
Camera settings

When I finally get stacking done, I will post my results. I even wrote a PowerShell script for taking the shots with Sony-Remote app. I fully automated the process of taking Light, Dark, Bias and Flat-frames. Night is short tho you gotta use it 😎.
This script was inspired by this site. https://www.andreasmariotti.de/automating-focus-stacking-in-sony-imaging-edge-via-powershell/

Disable the LED on the Pi Zero W

This was interesting. I found several posts on the net, on how to disable the green LED on the Pi Zero W. None of them where working. Then I noticed, that the led was just inverted. On state means the LED is dark off state means the led is lit.
So this is how it works:

echo default-on | sudo tee /sys/class/leds/led0/trigger # LED dark
echo none | sudo tee /sys/class/leds/led0/trigger # LED lit

The LED was lighting my whole bedroom. Now it’s dark at night again.

There are several options to trigger the LED. You can list them with cat /sys/class/leds/led0/trigger. The selected one becomes surrounded with square braces.

cat /sys/class/leds/led0/trigger
#none rc-feedback kbd-scrolllock kbd-numlock kbd-capslock kbd-kanalock kbd-shiftlock kbd-altgrlock kbd-ctrllock kbd-altlock kbd-shiftllock kbd-shiftrlock kbd-ctrlllock kbd-ctrlrlock timer oneshot heartbeat backlight gpio cpu cpu0 default-on input panic mmc1 [mmc0] rfkill-any rfkill-none rfkill0

As I didn’t find out how to set this using /boot/config.txt. I ust used /etc/rc.local. This way the LED is turned of when boot is completed.

Simple training protocol web-app.

Between the Christmas and New-year, I was starting a small project to get familiar with bootstrap. The Idea came to me, when I was talking to the dude I am Training with. He encourages us do track our Progress. We have a set of 5 or so Exercises to get a merely full body workout within an hour. Which fits nicely into my daily routine. So instead of doing it on Paper or PDF-Forms, I thought it would be nice to do it on my SmartPhone.

Implementation

The result is a web-based App which runs in a normal browser. You start with an empty Plan if you navigate to: netzlan.de/fit. The app is designed to generate an new ID and redirects you to an URL which contains the ID. So for accessing the log afterwards, you need to Bookmark the URL. The page is generated with static HTML. All the content is already loaded and hidden, or will be generated with JavaScript in response to the data returned from the back-end. The back-end is written in PHP, but the communication is JSON only. JavaScript is generating JSON for calling the back-end and the PHP is encoding its answer in JSON. So no HTML is generated with PHP. I chose JSON over XML because it has less overhead and you can work with it easily within Both PHP an JavaScript/JQuery.

Functions

The app is kept very simple. There are merely two to three functions. Generating the ID, getting the exercise protocol and adding new exercises.

Kartoffelgratin

Wenn es zum essen nicht einfach nur Salzkartoffeln sein sollen. Das Gratin ist sehr würzig und passt daher sehr gut zu Fleisch, dass selbst ohne Sauce und besonderes Würzen zubereitet wurde.

Zubereitung

Eine Flache Auflaufform mit Butter und Knoblauch einreiben. Kartoffeln in Scheiben ca. 5 cm hoch in die Form schichten.
Sahne mit Gemüsebrühe mischen. Ca. 1 gehäufter Teelöffel Brühe auf 200ml Sahne. Mit Muskatnuss und Pfeffer würzen. Die Mischung dann gleichmäßig über den Kartoffeln verteilen. Die Menge den Kartoffeln anpassen. Die Kartoffeln sollten nicht in der Sahne schwimmen.
Zum Schluss etwas geriebenen Käse darüber geben. Etwas Paniermehl führt zu einer knusprigen Kruste.
Das ganze dann für 55 Minuten bei 180°C Umluft im Backofen backen.

Zutaten

  • Kartoffeln (festkochend) 600g
  • Sahne 200ml
  • Käse 200g
  • Gemüsebrühe 1TL
  • Muskatnuss
  • Knoblauch
  • Butter
  • Paniermehl

Kartoffelpuffer nach Omas Rezept

Oma:
Hallo, hier das Rezept:

Kartoffel schälen und reiben,
1 Ei, eine kleine Zwiebel (die gleich reiben, sonst wird die Masse braun), Pfeffer und Salz und ca. 2 Suppenlöffel Mehl. In Öl braten.

Zubereitung

Die Zwiebel zusammen mit den rohen Kartoffeln reiben. Das Ei und das Mehl hinzugeben. Mit Pfeffer und Salz würzen und verrühren.

Reichlich Öl zum braten verwenden und kross anbraten.

Zutaten

  • Kartoffeln
  • Eier
  • Mehl
  • Zwiebeln
  • Pfeffer und Salz
  • Öl

Pancakes (Buttermilch Pfannkuchen)

Im Gegensatz zu den Eier-Pfannkuchen sind American-Pancakes, dick und fluffig.

Dazu passt am besten: Echter Ahorn-Sirup, den man in Deutschland im Supermarkt leider selten findet. Meistens ist es dann Zuckersirup aus Mais mit Ahorn Aroma.

Zubereitung

Alles bis auf das Öl verrühren. Die Menge an Backpulver und Natron bestimmen wie fluffig der Teig nachher wird.

Man kann die Pancakes in einer beschichteten Pfanne auch ohne Fett braten. Gibt man jedoch eine kleine Menge Öl vor dem Teil in die Pfanne, bekommen die Pancakes einen knusprigen Rand.

Zutaten

  • 2 Eier
  • 4 Esslöffel Butter
  • 250g Buttermilch
  • 175g Mehl
  • 1/2 Teelöffel Backpulver
  • 1/2 Teelöffel Natron
  • 1 Esslöffel Zucker
  • Eine Priese Salz (1/2 Teelöffel)
  • Öl zum Braten

Weihnachtliche Beleuchtung mit ATtiny85 und WS2811

Wenn man im Dezember zu Weihnachten durch die Straßen geht, sieht man an vielen Stellen Blitzenden und hektische Beleuchtung an Fenstern, Zäunen und Bäumen.
Weinachtleiche Beleuchtung ist schön. Nur könnte sie etwas ruhiger, aber trotzdem nicht langweilig sein. Sternen-funkeln wäre schön. Bunt wäre auch nicht schlecht. Eine Lichterkette, bei der die einzelnen Lichter zufällig anfangen in einer zufälligen Farbe ein und dann wieder auszublenden.
Und wie immer wenn es so etwas nicht gibt, muss man es halt selber bauen.

Testaufbau für Entwicklung

Komponenten

Für die Umsetzung findet verschiedene Angebote für Lichterketten mit WS281x und WS2801 Chip. Die beiden Chips unterschieden sich durch den Bus, über den sie angesteuert werden. WS2801 verwendet einen Zweidraht Bus. Eine Leitung für den Takt und eine andere für die Daten. Die WS281x Serie wird über einen Eindraht Bus. Der Takt ist fest mit 800 Kinoherz vorgegeben.
Ein Ring aus WS2812, wie im Video zu sehen, dient zum Testen.

Das kleinste was mir für die Steuerung eingefallen ist, war ein ATtiny85. Hier gibt es für die Arduino Umgebung eine fertige Bibliothek eine zur Ansteuerung der WS281x, die auch den ATtiny unterstützt. Man findet sich über die Suche unter „NeoPixel“.

Schaltung

Die Schaltung gestaltet sich als äußerst einfach, sowohl ATtiny85 als auch WS2812 werden an 5V Versorgungsspannung angeschlossen. Die Lichterkette soll später 0,3W pro Pixel haben. Bei 50 Pixel sind das 15 Wart, die das Netzteil liefern muss. Für den Testaufbau genügt der USB-Port. Ein 1000µF Kondensator soll spitzen vom Netzteil und Schwankungen durch Stromverbrauch der LED ausgleichen.
Der Daten-Pin der WS2812 wird an Arduino PIN 1 beziehungsweise Pin 6 des ATtiny85 Gehäuse angeschlossen. Die Pins werden nämlich unterschiedlich nummeriert.

Programmcode

Folgendes Programm steuert dann die Pixel.
TODO: Beschreibung des Programmcode 😉

// there is a 1 in IMPROBABILITY chance to activate a pixel
#define IMPROBABILITY   600

// there are COLORCOUNT colors to chose from
#define COLORCOUNT        8

const byte COLOURS[COLORCOUNT][3] = {
  {65,105,225},//royaleblue
  {255,140,0}, //darkorange
  {178,34,34}, //firebrick
  {99,235,50}, //yellowgreen
  {255,69,0},  //orange red
  {127,0,225}, //lila
  {255,203,5}, //green
  {255,10,10}  //red
};

#include <Adafruit_NeoPixel.h>
#ifdef __AVR__
  #include <avr/power.h>
#endif

// Pin connected to the NeoPixel Data pin
#define PIN            1

// How many NeoPixels are attached
#define NUMPIXELS      50

Adafruit_NeoPixel pixels = Adafruit_NeoPixel(NUMPIXELS, PIN, NEO_GRB + NEO_KHZ800);

void setup() {
#if defined (__AVR_ATtiny85__)
  if (F_CPU == 16000000) clock_prescale_set(clock_div_1);
#endif
  
  randomSeed(analogRead(0));
  pixels.begin();
}

void loop() {
  for(byte i=0;i<NUMPIXELS;i++){
    pixels.setPixelColor(i, fadein(i));
  }
  pixels.show();
  delay(50/NUMPIXELS);
}

uint32_t fadein(byte pixel) {
  static byte pcolor[NUMPIXELS] = { 0 };
  static byte pvalue[NUMPIXELS] = { 0 };

  if (pvalue[pixel] > 0) {
      pvalue[pixel]++;
  } else if (pvalue[pixel] == 0) {
    if (random(IMPROBABILITY) == 0) {
      pvalue[pixel] = 1;
      pcolor[pixel] = random(COLORCOUNT);
    }
  }
  
  float x = (float)(128-abs(pvalue[pixel]-128))/128;

  byte new_r = COLOURS[pcolor[pixel]][0] * x;
  byte new_g = COLOURS[pcolor[pixel]][1] * x;
  byte new_b = COLOURS[pcolor[pixel]][2] * x;

  return pixels.Color(new_r, new_g, new_b);
}

Schneewittchenkuchen

So, ein neues Backrezept. Nach den Kulleraugen hier jetzt auch mal ein Kuchen. Manche werden ihn auch unter dem Namen Donauwelle kennen. Diese Variante ist dem was meine Mutter immer gebacken hat am ähnlichsten.

Am besten zuerst die Kirchen in ein Sieb abschütten. Es dauert eine Weile bis die richtig abgetropft sind. Genauso kann man sich schon mal 200g Butter für die Buttercreme in eine separate Rührschüssel abwiegen. Dann kann die schon mal warm/weich werden.

Teig

Ab hier braucht ihr einen Mixer mit Rührstäben.
Die 200g Butter für den Teig in eine Rührschüssel geben und geschmeidig rühren. Dazu dann 160g Zucker, das Päckchen Vanillezucker und die 4 Eier geben und verrühren.

Dann die 300g Mehl mit dem 2 Teelöffeln Backpulver dazugeben und wieder verrühren. Dann ist erst einmal der Weiße Teig fertig.

Nehmt euch ein Backblech. Meins ist 37x26cm (0,0926m² 😉 ). Wenn eures größer ist, müsst ihr die Mengen entsprechend hochrechnen.
Das Backblech legt man Backpapier aus. Man kann etwas Teig zum Festkleben darunter geben. Dadurch verrutscht das Backpapier nicht so stark, wenn man den Teig darauf verteilt.

Auf das Backblech kommen circa 2/3 des Teiges (So genau muss das nicht sein.) und werden gleichmäßig verteilt. Mit einem Kochlöffel geht das ganz gut. Es soll Leute geben. die dafür auch einen Teigschaber nehmen.
Der Rest des Teiges wird mit den 16g Kakaopulver und dem Esslöffel Milch verrührt und danach auch gleichmäßig verteilt.
Den Ofen kann man schon mal auf 180°C vorheizen.

Bevor der Kuchen in den Ofen kommt werden auf dem Teig die 700g Kirchen gleichmäßig verteilt. Wenn der Ofen heiß ist, kommt das Blech für 40 Minuten rein.

Das ganze sieht dann etwa so aus, wenn es aus dem Ofen Kommt.

Buttercreme

Während der Kuchen abkühlt, kann man sich schon mal an die Buttercreme machen. Dazu nimmt man 200g Butter die Zimmertemperatur haben sollte.

Dann bereitet man einen Pudding zu. Den Pudding lässt man aber nicht normal abkühlen, sondern schlägt ihn mit dem Schneebesen alle paar Minuten mal durch bis er Handwarm ist. So bildet er keine Haut. Das abkühlen dauert eine Weile.

Von dem abgekühlten Pudding rührt man Löffelweise 450g in die Butter. Gibt man zu viel Pudding auf einmal dazu, gerinnt die Buttercreme. Das sieht nicht so schön aus. Ich habe erst einen, dann Zwei, dann drei und so weiter Esslöffel Pudding mit der Butter verrührt.

Die Buttercreme kann man dann auf dem Teig verteilen.

Das Blech muss jetzt im Kühlschrank richtig abkühlen. Ich mache das über Nacht. Dadurch wird die Buttercreme fest und verläuft nicht gleich, wenn wir im nächsten Schritt die Heiße Schokolade darüber geben.

Schokoladenüberzug

Die 150g Schokolade zerkleinern und mit 15g Pflanzenöl langsam erhitzen und verrühren. Wenn man die Schokolade nicht zerkleinert, kann es beim schmelzen Klümpchen geben.

Die warme Schokolade mit einem Löffel auf den Kuchen geben und mit einem Pinsel verteilen. Dabei sollte man schnell sein, Die Schokolade wird auf dem Kalten Kuchen schnell fest.

FERTIG.

Zutaten für 0,0962m² 😉 Kuchen

Teig

  • 200g Butter
  • 160g Zucker
  • 1 Päckchen Vanillezucker
  • 4 Eier
  • 300g Mehl
  • 2 Teelöffel Backpulver
  • 1 Esslöffel Milch
  • 16g Kakaopulver (ungesüßt)
  • 700g Sauerkirchen

Buttercreme

  • 200g Butter
  • 400g Pudding (zum Beispiel Fertigmischung)

Kuvertüre

  • 150g Schokoladenkuvertüre
  • 15g Pflanzenfett/Öl

How to modify your „hosts“-file on Android

Context

I am using LineageOS 14.1 which has Android 7.1.2 as base. My phone is not rooted, because there is no reason for me to have root access. As i wanted to keep it that way, I used TWRP to change the „host“-file. Unfortunately this broke the host file lookup. So I am documenting here a correct way to do it.

Preparations

First of all we want to use ADB (Android Debugging Bridge). This way you can have root shell access to Your phone from Your PC.

You need to download the Android SDK from https://developer.android.com/studio/#downloads. Unzip it somewhere you like.

Then connect your phone with you PC using USB. Go to your settings, scroll down to development settings. Activate Root access for ADB and USB-debugging.

Now open a command-line on your PC and navigate to the Folder you extracted the Android SDK.

adb root
adb shell

Making the Modification

The „hosts“-file is located under /system/etc/hosts. You can not start right away. /system is mounted as read-only partition. To modify it you need to make it writable. You use the following mount command for that.

mount /system -o remount,rw

Now you can write some stuff to the „hosts“-file. I chose to use one from someone who cares http://someonewhocares.org/. Obviously this only works if your phone has a active internet connection.

wget http://someonewhocares.org/hosts/zero/hosts >/system/etc/hosts

After you ‚re done, make sure to mount the system partition read-only again.

mount /system -o remount,ro

Now you should test it by running using the ping command with one of the hosts you just added.

If it works, you can disable USB-debugging and ADB root access. You should reboot your phone to check if this works too.

Problems I encountered

Back to the problems I mentioned at the beginning of this Article. When I first tried to modify my „hosts“-file, I got stuck by ping and every other application ignoring the file.
This was because of SELinux detecting the modification and blocking access to the modified file. I think I changed the inode somehow. You should check the kernel messages with dmesg |grep host command. To see if the SELinux is complaining.

I was able to fix this problem with restorecon command. It seams to be part of SELinux and is able to restore security contexts.

restorecon /system/etc/hosts

Here is some Documentation about the restorecon command. https://fedoraproject.org/wiki/SELinux/restorecon

I could not reproduce the error I got, when I was copying the a new hosts file using the recovery. Maybe you are always fine when you overwrite the content of the file with a command like this.

cat newhostsfile >/system/etc/hosts